All posts by Bubble0Sunshine

About Bubble0Sunshine

I am a Research Phyics and Art major surviving that twenty-nothing year. This is my blog for my 2D-Composition class and future classes to come in the, well, future!

In-progress module cascade

Missed Blog post (WP 9)

image

This is my fantastic unit that I had going on.  It was to be, once again, wall mounted because typically if anything is on a wall, it is pretty flat. I wanted the wall to have dimension.  Only, I am thinking of putting this one in the corner.

As I am making the three tubes coming out, I am rotating each piece by 1/5 to get a sort of spiral going on, but I’m not so sure it is too noticable.
Anyway, I am honestly not as impressed with how this one is turning out as compared to my previous one.  I really liked the radial, flower burst that one had going on.

Repetition object choice

Here is another missed blog. (WP 8)

When we had to take our original module and create our second set up, I wasn’t sure what exactly I wanted to do.  I wanted to stray away from the redial design I had earlier, but I really liked that one.  I struggled with coming up with something, but after playing with them for a while, I had decided that instead of some how incorporating all of my units into one super unit, I would make multiple super units.  and the only way I could think of branching away from something radial was to have them in a line and I though they would be cool cascading downward.

Photo Studio

Here is a post I must have missed.  At the beginning of the semester, Mark took us to the photo studio and introduced us to the cameras and all of the amazing things that we can do in there.  He showed us how to ideally set up our work and how to document it.  He suggested different ways that we could set up the different lighting options and he showed us what effects they can give.  I also finally understood why photographers will some times have someone standing adjacent to them holding a reflecting panel.  After being showed how this softly illuminates the other side of the object, I was amazed because I never actually noticed it doing anything. I found it rather cool that we had the ability to hang things and document them that way.  Another thing we were showed was the different backdrops and how the helper/aid in there and help you with anything you need.
After working in there a few times, she is really nice, always polite, and always letting us know that if we need anything, she would help and could answer any questions.  I also liked that if we needed to document our work outside of the room, the aid never had a problem with going elsewhere with you to document it.  A+ all around for her!

Would you like Waffle Fries with that?

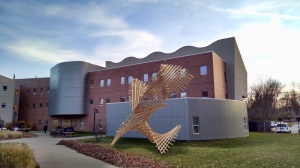
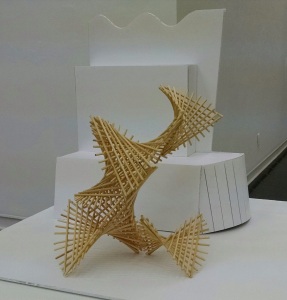
With having a lot of freedom to create basically anything that we want, I once again referred to trying tie together art with physics/math.  Our only limitation was that it was to be a public art piece and our model had to be made of skewers.  After researching different patterns, I remembered those parabolic curves we use to doodle in grade school.  After transforming this simple doodle into a 3D shape multiple times, I began to play with how to fit them together.  Originally I wanted to create a tunnel.  I decided that once the shape was big enough to fit a human under it and then allow some extra room,  that this tunnel would just be really big and overwhelming,  so I decided to just keep it sculptural.

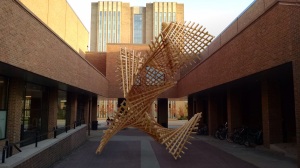
I wanted to still incorporate a tunnel feel into it, so I had my units spiral upwards, still creating a tunnel, but not really one that can be walked through.  Upon being asked what kind of material I would make this out of, I am still unsure.  I like the natural wood because it then fits in with all of the trees lining the walk through that part of campus, but I would also like it to be made of something similar to the building to help make the connection a little stronger.  I am not sure if this connection would really need to be made stronger.  I would think a good color for this piece would be a dark gray so that it still fits the building and a gray wood would match the trees.   This piece can be viewed as waffles fries (as my family continued to call it while watching me make it over break) to the everyday Joe, or it can be seen as hyperbolic paraboloid to those who understand the concept.  I feel like this piece would obtain the nickname of Waffle Fries no matter what just like how the Cloud Gate is commonly known as the Bean in Chicago.

image

One change I would like to see how it would impact this piece is if I were to trim off all of the ends that hang off the sides and make them a clean V-shape.  If this piece were to actually be built, I would create another model with those ends measured precisely to lie flesh on the side and to get a common consensus of which is favored.

I would love to see how my piece would interact with the different seasons and times of day.  I’m sure it would cast some fantastic shadows from the sun.  It would also look gorgeous after a huge snowfall when it is stacked up on the  grids.  The grids would also cause a huge trap during the fall for all of the leaves and debris, but it wouldn’t be anything that a leaf blower wouldn’t be able to handle.  In the spring, I would like to see a bird nest or two find a spot in my piece.  I am curious to know how all of the squirrels will interact with it.  Overall I can see students hanging out by my piece chatting between classes, using it as a meeting place, and during those nice days during finals week in the spring, I can see students sitting under it studying.   Overall, I have a really good feeling from this project and feel that it has the potential of being created.

image

image

image
(
I forget who I was talking to, but it was suggested that my art make its way to another planet.  So, I got NASA to capture it for me.)

Skewer Progress

So after spending the whole last project working with little thin sticks and hating life, here we are again, working with thin sticks.  I would much rather be eating shish kabob’s off of these skewers than trying to get them to stay glued together.  This time, super glue is my best friend instead of Elmers!

Upon my scavenger around campus to find environments, I noticed that there are a decent amount of sculptures evenly scattered around campus except on the science mall.  Go Figure.  I mean, art and math/science? How do those mix asked the physics and art major.  Well, I know how to fix this.  I’ve always found interest in fractals and the fibonacci sequence.  I researched other geometrical and mathematical patterns and I stumbled across the Seifert surface.  These looked pretty neat, I just wasnt sure how to translate that into skewers without continuing to hate life.  I then stumbled upon hyperbolic paraboloids.

Seifert Surface
image

Hyperbolic Paraboloid
image

Now, we all remember doodling hyperbolic paraboloids in middle school right? Well I decided to take those doodles up a notch and make them 3D.  Here is what I have so far.  I would like this to go outside of the math building, but I would look decent in other environments as well; it just wouldn’t make the same connection.  I also think the sine wave on the math building fits with this well.

image
My shapes individually look pretty cool so far.

image
But they also can create a unique tunnel when put together.

My thoughts on fire.

Over all, this last project just kept giving me grief and I got to the point where I just wanted to finish it.  My original idea was to use my online generator game which lead me to creating a giraffe morphing into a lamp, out of matches.  I had this awesome idea in my head as to how this was going to look in the end and I was super excited for it.  But the first problem came was gluing the matches together and time it took for them to dry.  It was just taking way too long and I couldn’t just sit there holding pieces while they dried so that I could glue the next few pieces on and do the same thing.  This would have taken more than a week, I can promise you that.  This led me to go back to my bubble page and come up with something from that.  I had folded that page up and stuck in my pile to go home and be filed away.  (lesson learned: don’t fold it, you may actually need it)  I had someone connect the dots and find shapes and to just outline prominent things in the bubbles.  I glued matches together in sets of 5 and then glued the sets to match up with the full bubbles and now outlined shapes.  I guess I would have outlined the bubbles I used in marker like the shapes were, but I didn’t because had I done that, you wouldn’t seen their outline, it would have looked like I just drew a circle in there.  Overall, I should have redone this step on a fresh sheet of paper and found a way to make the bubbles darker than what I had.  When I had this set up, I left it in the foil because I was thinking along the lines of the matches now being dead, burned, and in their final resting place.  I guess for the idea of this project, it would have been presented better if I had placed those final pieces on the bubble paper so that one could better make the connection of where my patterns came from.  If I were to ever redo this project and have it in an actual gallery, I would redo the bubbles, making them darker and have the burned matches laid out on their shape from that paper.  Then, on a wall behind them, I would have the video playing on loop with headphones attached because I’m sure not everyone would want to hear that alarm on repeat!
It was suggested in class that I should have burned the matches on the bubble paper, but I disagree.  There is no way that the paper would not have caught fire too.  I didn’t light my project up outside because that felt out place to me.  It was also really windy that day.  My other reason was that we have granite counters at home and I always love when its someones birthday and I can see the reflection that the candles make in the granite, I wanted to have that in my video too.  With this being done in doors, there was no way I was going to light more than what was necessary on fire.  I really didn’t want to risk burning the whole place down.
With that being said, No more dwelling on the ‘should-a, would-a, could-a’s’, and just enjoy the fire because I finally got that up!   🙂

Lighting Bubbles on Fire

Fingers crossed that this now works!!  I do suggest turning the volume way down because the smoke alarm gets pretty loud and annoying.  I feel bad for my roommate who happened to be in the shower at the time that I started this and was a little confused at first what was going on.  My original plan was to edit the sound out and find a song, so I wasn’t concerned with talking while I was recording this, but I sort of wish I didn’t talk because afterward I decided to keep the alarm in there.  Enjoy!

Im Trying

Apple Products and I disagree.  I thought I would be smart and take this video on my ipad and then it would be a quick upload.  I’m having huge issues!  Basically, my file is too big and I am completely lost on how to fix this problem and convert it to a format that I can upload to WordPress.  My understanding is that it can only take GIF’s.  My video also decided that it wanted to be upside down and Movie Maker is not cooperating.  This is the closest I got. Here is an awful GIF of a segment of my video.
IMG_0518 (5)

Just how do bubbles convert to matches?

So, my original plan was to go with my online generator game and what I ended up from that was to create a giraffe lamp out of matches.  This ended up being a million times easier said then done. After a lot trial all being followed by error, I decided to take another look at my bubbles.  I also now had a few thousand matches on hand decided that whatever I was going to do, it was going to involve matches.  I took the matches and started gluing them together to follow the arches of some of the more prominent bubbles.

image

I then had a friend draw some straight lines on top of the bubbles, connecting points that they saw.  This sort of turned out to look like a map of the constellations.  I began to now link the matches all together in these patterns.

image

image

image

This task became a lot more time consuming then I thought it would have been.  But, that is the way that art is!

There is a reason why these bubbles were clearanced

Trial and error right?  So, I had bought a bottle of bubbles from the clearance shelf.  They were on that shelf for a reason apparently, and that reason was the ratio of water to soap was a little off.  I must have been 1000:1.  Needless to say, I added some soap.  That helped a little, but I’m sure real bubble would have worked better.   After some tries, I realized the marks just weren’t showing up how I wished they would.   I added some ink to the bubbles, and as you can see in this first picture, that helped.

image


Here is after more bubble blowing.  The ink really helped them show up better.  I then added in the rest of my ink to make them even darker.

image

This is the final picture. I wasn’t too satisfied overall.  I thought I would have more spots were the bubble stuck to the paper and would leave rings.  Most of them burst upon the slightest contact with the paper leaving splatter marks.  While this remind me of the night sky in the country (which made me happy) I am not seeing images in here like I thought.  On the last panel I. Wanted to see what it would look like if I just took the bubble want and smacked the paper.  It still wasn’t what I was looking for.  I am deciding that this idea was more of an error.

image